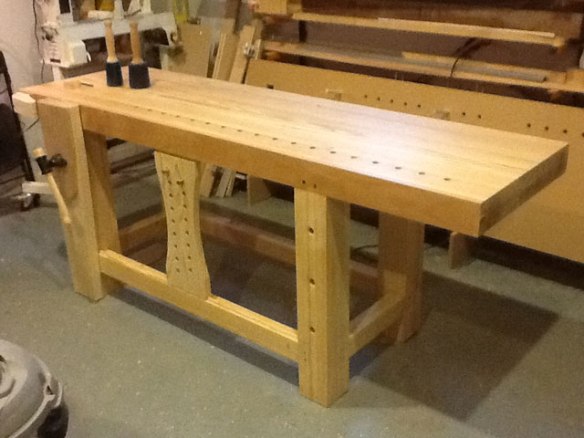
Adding our August 2013 Workbench of the Month from Ariel J. of Travelers Rest, South Carolina to our Lake Erie Toolworks Blog for ease of access and historical awareness.
Basic Information:
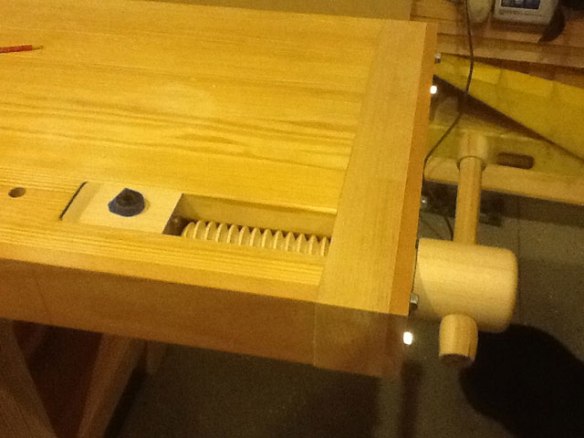
The bench was originally constructed without a Lake Erie Toolworks Wagon Vise. The original bench was finished in January 2013. The retrofit of the Lake Erie Toolworks Wagon Vise was completed in April 4, 2013.
Type of bench, wood used, finish:
Roubo type work bench, Southern Yellow Pine, Hickory and Beech, finished with varnish, linseed oil and mineral spirits.
Comments (Anything you’d like to share with us or your global audience):
This whole thing started from a conversation with John, a store worker and fellow woodworker from the local Woodcraft in Greenville, SC. John steered me to reading a book on workbenches. I embarked on constructing the “Roubo” after reading the book by Chris Schwarz on workbenches. I started the project before Christmas in 2012. I got sidetracked by a trip to Belgium on business. Upon my return in mid January, I got back in earnest to finish the project. This workbench is based on the writing of Frenchman Jacques Andres Roubo in late 1700s.
The dimensions and construction is based largely on the designs Chris had recommended. The drawings in Chris’ book specified an 8 foot long bench. My bench is a foot shorter, with a proportionately shorter base. Other than the length, the modifications I made include gluing a European beech face on one edge and facing the leg where the leg vise is with hickory. The leg vise itself is made from hickory. The bench is made of southern yellow pine (SYP) except for the exceptions noted. The top has round dog holes and round hold fast holes. The moving deadman is identical to what Chris had drawn. The moveable deadman that allows the clamping of extra long stock against the front face of the bench. The entire workbench can be regarded as a three dimensional clamping device.
All the joints are mortise and tenon, drawbored and pegged with contrasting color – walnut dowels. The top is finished in 1 part varnish, 1 part linseed oil and 1 part mineral spirits. The wagon vise is a late retrofit.
Ever since finishing the Roubo workbench in January, I had wanted to add a wagon vise to make the row of dog holes much more utilitarian. I had to decide whether to make or buy. If I were to buy, I had to decide on hardware. Benchcrafted sells a tail vise screw kit. The other choice is a wood screw by Lake Erie Tools. I decided to go with the latter and bought the hardware a month ago. All it is really is a screw and a nut and some hardware to bolt on to the movable dog.
Step 1 is building the end cap.
Step 2 and is the critical step is in hogging out all the material. For this step, a router with a spiral upcut it is chosen. The first cut is along the back edge establishing the spline by removing the 1.5 inches of material from both sides (first with the bench right side up and then upside down).
Step 3 is in hogging out the channel for the movable dog.
Step 4 is in making the dog block assembly. Runners are made from a UHMW block inserted into a dado in the dog block. The runner is trapped by a maple runner screwed into the underside of the channel.
Once that is completed, the last step is to bolt the end cap using 6 inch SPAX lag bolts. No glue is used.
The operation of the Lake Erie Toolworks wagon vise is quick and smooth – thanks to the close tolerances I was able to maintain during the build and the overall superior quality of the screw and nut produced by Lake Erie Toolworks. I am very happy with the way my workbench is now able to carry out the multitude of workholding that I expected from it – very special thanks to Nick Dombrowski and Lake Erie Toolworks.
Visit my website at jacalawoodworks.com
Ariel J. – Travelers Rest, South Carolina


