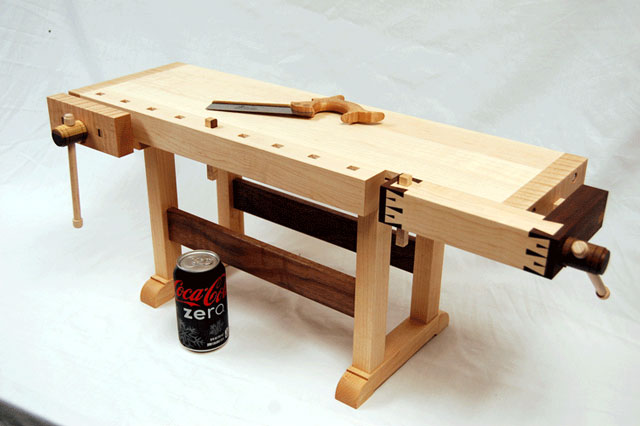
Our March 2015 Workbench of the Month comes to us from Michael L. from Fort Collins, Colorado. Michael has built a rock solid Roubo workbench with the added feature of a linear bearing assist that he highlights for your awareness and consideration. The end product workbench is Amazing. Job well done Michael.


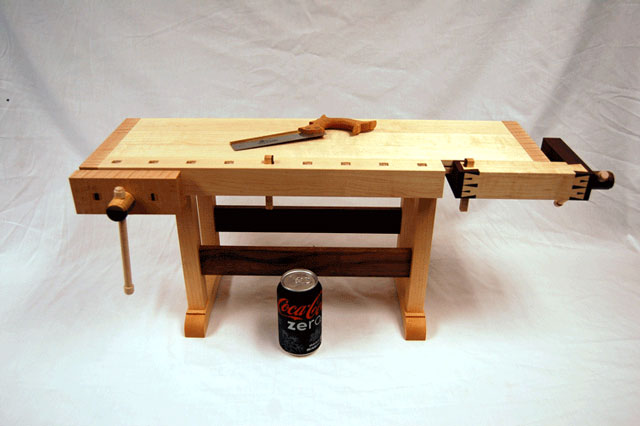
This is a 4” thick, 87” long, and 24” wide and 35 ¼ high maple workbench with a leg vise that combines the Lake Erie leg vise screw kit with a linear bearing as recommended by Matt Armstrong in this blog:
http://www.thewoodwhisperer.com/articles/roubo-workbench-leg-vise-alternative-linear-bearings/
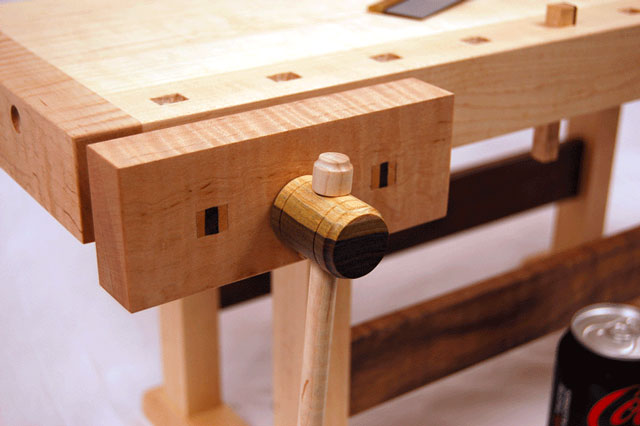
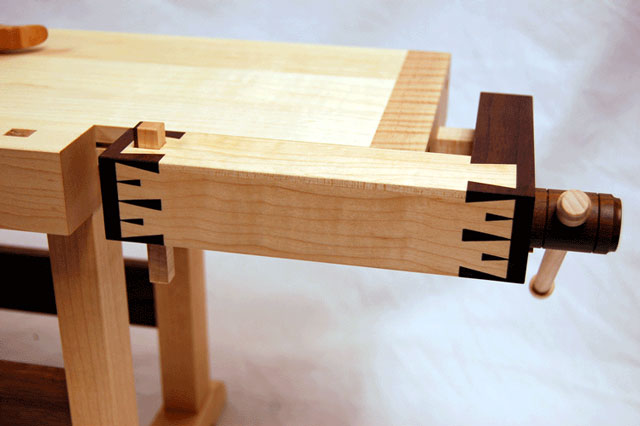
The linear bearing is a LB30UU 30mm Ball Bushing 30x45x64 Linear Motion Bearing for USD12.95. The rod is a Hardened Precision Metric Steel Shaft, 30 Mm Diameter, 500 Mm Length from McMaster. I recommend starting the holes with a router and a circle jig. I tried making the first hole with a 2 9/16” diameter self-feeding Forstner bit that I bought just for this and ended-up going off at an angle downward about a half way in even with drilling a guide hole first. My first response was to fill the hole with a dowel and start over. But fortunately I emailed Nick first, who suggested a simple and really obvious strategy of aligning the hole with a file. Since I had to remove about ½ an inch, I first used a jigsaw, which worked very nicely because I could square it off to the leg, and then finish with a rasp. The larger hole in the back does not matter because the vise nut covers the back and supports the screw anyway.
I attached the vise nut with wooden oak dowels and glue. I still have to saw off the dowel ends as you can see in one of the pictures. The chop is maple and I used the dimensions from Christopher Schwarz’s wonderful Workbench Design Book. I did not want to laminate the jaw so I made it from 2” thick piece which was fun to work with. Also, Nick’s suggestion to measure the 1/8” above the bench is perfect because after I installed the screw and chop, it was level with the top. After the screw was installed I measured, cut the hole and installed the linear bearing. You need to do the screw first so that the linear bearing fits perfectly.
The chop moves smoothly and parallel to the leg and the grip is perfect. Of course, the leg vise allows for a diversity of ways of holding your work, including long pieces, and racking is not a problem. One really great feature of the wooden screw that I have come to appreciate is that it just takes a turn or two to open and close the vise. An advantage with the linear bearing you don’t have to bend down to change and adjust pins, and it’s much easier to build than any of the alternatives.
I followed Chris’s advice to start with basics and then see what you need: the leg vise, a crochet (really an excellent accessory to the leg vise), and 5 holes for holdfasts. I think down the road I will do an endvise, but for now I am set.
It’s a large table, but that makes it very easy to work with and do several projects. But it is heavy, as I discovered when it came time to turn it on its legs. I had glued the benchtop on a worktable I made and attached the legs from the top, so to speak, and when I was done I realized I had no idea how to turn it over. The thing must weigh well over 500lbs, and there was nothing about this in Chris’ otherwise perfect workbench bible. So I wrote him and he responded: “I know it sounds crazy, but I build benches by myself and move big ones around without assistance. When I’m just flipping the top, I clamp a long bar clamp (about 50” long) to the top and use it like a lever to turn the top over. When I need to flip the entire bench over, I use two sawbenches, placed so they are not in line with the legs. Then I use the clamp to tip the bench up until the benchtop snags the tops of the sawbenches. Then the bench will swing easily up on its side on the sawbenches. Then I move the clamp (if necessary) and turn the bench another 90°. You’ll be surprised what you can accomplish with a little leverage.” Yes, indeed, Archimedes strikes again: “Give me a stick long enough and a pivot and I shall move the world.”
Michael L. – Fort Collins, Colorado