2X Vise Equals Fast Moravian Workbench

Quick heads up that Will Myers, the driver of the modern Moravian Workbench style has a new blog site where he has recently posted about his experiences with using our new Lake Erie Toolworks 2X wooden vise on his latest Moravian Workbench build.

Thinking about building a Moravian bench with a 2X Wood Vise, take a look/see at his recent two blog posts that will give you the low down on this front.

https://eclecticmechanicals.com/2018/10/30/its-a-big-one/

https://eclecticmechanicals.com/2018/11/11/its-a-big-one-part-2/

Will Myers, Moravian Workbench, Leg Vise, 2X Vise, Wood Vise, Wooden Vise

Enjoy this Moravian Workbench Rocky Mountain Beauty – July 2018

Will Myers has clearly helped pave the way to assist many woodworkers around the globe who have interest in the Moravian Workbench style to achieve their vision.  Our latest Lake Erie Toolworks Workbench Idea for July 2018 exemplifies this fact spot on.

Thank you to Gerry F. from Boulder, Colorado who built this Rocky Mountain Workbench Beauty from a Douglas Fir tree that came down during a Spring blizzard last year.  For a self-professed amateur woodworker, he did quite the amazing job.

Lake Erie Toolworks, Moravian Workbench, Wood Vise, Wooden Vise, Leg Vise, Leg Vice, Wood Vice, Wooden Vise

Lake Erie Toolworks, Moravian Workbench, Wood Vise, Wooden Vise, Leg Vise, Leg Vice, Wood Vice, Wooden Vise

Lake Erie Toolworks, Moravian Workbench, Wood Vise, Wooden Vise, Leg Vise, Leg Vice, Wood Vice, Wooden Vise

Lake Erie Toolworks, Moravian Workbench, Wood Vise, Wooden Vise, Leg Vise, Leg Vice, Wood Vice, Wooden Vise

The DougFir tree came down last May during a Spring blizzard. It was too big for me to haul to the mill and would have been wasteful to buck up for firewood. So while browsing for project ideas I came across your site highlighting Will Myers reproduction of the Moravian Workbench and knew that I’d found the perfect match for the log.

I milled the log with a chainsaw mill to the dimensions from Will’s PDF cut list and set it in the barn to dry. The tool chest was something I added to complement the gorgeous vise screw crafted by Nick at Lake Erie Toolworks.

I am an amateur and was happy to learn and apply a few new tricks along the way. It is one of the reasons why I love woodworking. The project took me a month to complete and am pleased with the final result.

Gerry F. – Boulder, Colorado – USA

Announcing Our November 2017 Lake Erie Toolworks Workbench Idea

Our latest Lake Erie Toolworks Workbench Idea for November 2017 comes to us from Marcel K. from Auckland, New Zealand.  Marcel has built a tremendous Moravian Style Workbench using the Will Myers Moravian build DVD as his inspiration and guide.  Kudos to Marcel, as well as to Will Myers and Joshua Farnsworth for helping to make this reality happen.

Lake Erie Toolworks, Moravian Workbench, Wooden Vise Screw, Leg Vise

Lake Erie Toolworks, Moravian Workbench, Wooden Vise Screw, Leg Vise

Lake Erie Toolworks, Moravian Workbench, Wooden Vise Screw, Leg Vise

Lake Erie Toolworks, Moravian Workbench, Wooden Vise Screw, Leg Vise

Lake Erie Toolworks, Moravian Workbench, Wooden Vise Screw, Leg Vise

Hi Nick,

I can’t believe it took me this long to build it but I finally finished my workbench.

Not sure whether it meets the standard of the other awesome workbenches in your blog but I thought I’d fire some pictures and text (below) through to at least show that the vise has eventually been put to use.

And of course let you know my appreciation of your vise screws.

Kind regards,

Marcel K. – Auckland, New Zealand

Details/Comments

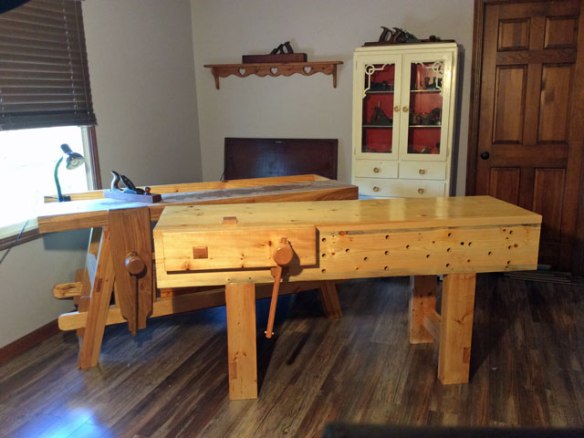
When I first saw Will Myer’s WKFineTools article on the portable Moravian design I knew it was a perfect choice for the tight confines of my garage. Basically I wanted something that was solid/heavy yet not too big and could still be relatively easily moved when needed.

The only thing I wanted to change was the tool tray as I preferred having extra bench space so to SketchUp I went and started working on modifying the design to incorporate the Roubo split top idea. After a year of pondering (while building my tool chest) an article appeared on the Lake Erie blog about a great compact version of a “Split Top Moravian” from Ron G in Florida which confirmed my ideas.

While finishing my tool chest I bought Will Myer’s fantastic DVD (“Building the Portable Moravian Workbench”) and watched it repeatedly while acquiring the lumber and letting it dry a bit. After purchasing the Lake Erie Toolworks vise screw I set to work in December last year.

Yes it took me about 10 months of working off and on to complete!

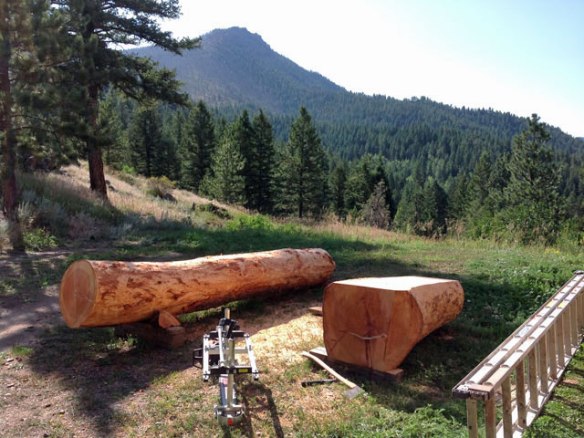
I did nearly all of it by hand (rough-sawn stock dimensioning, joinery etc) and only submitted to power at the end to cut the back slab to final width using a circular saw. By then I thought I’d had enough hand sawing practice!

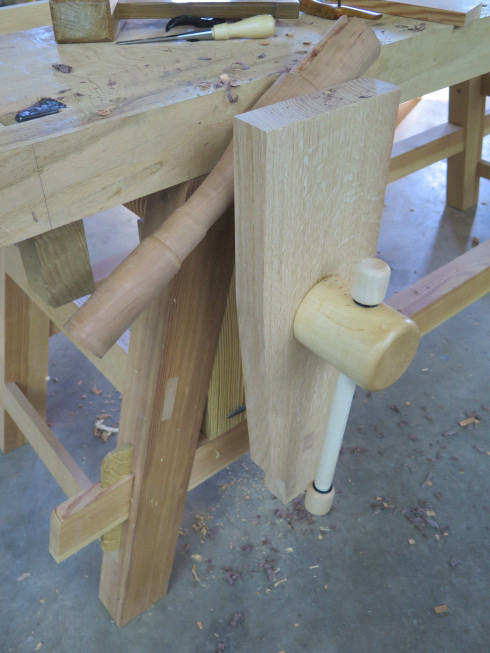
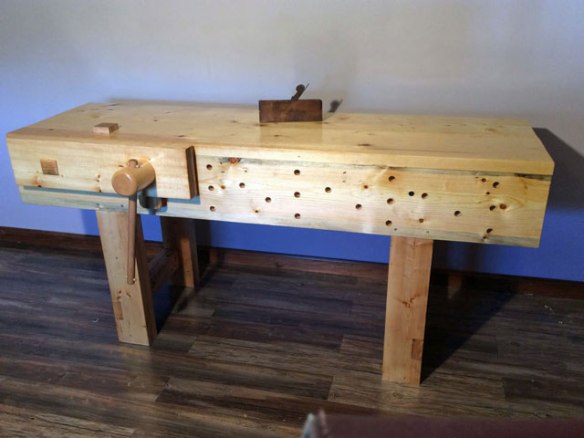
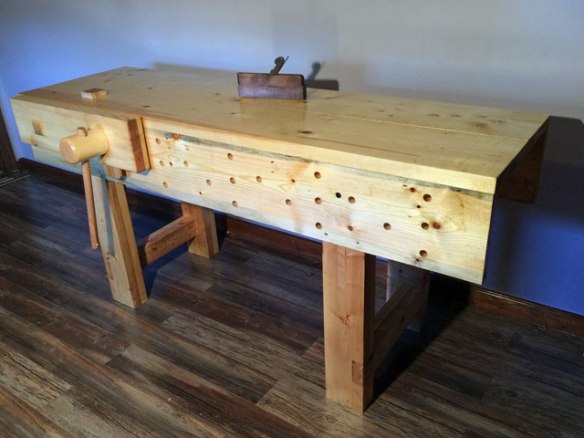
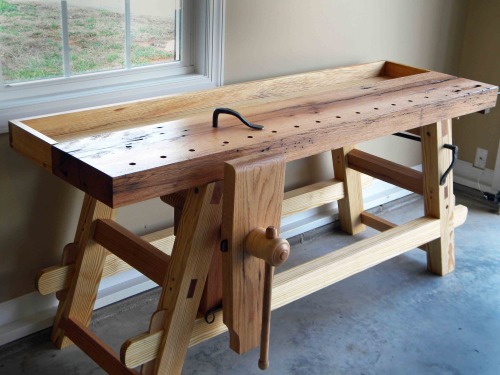
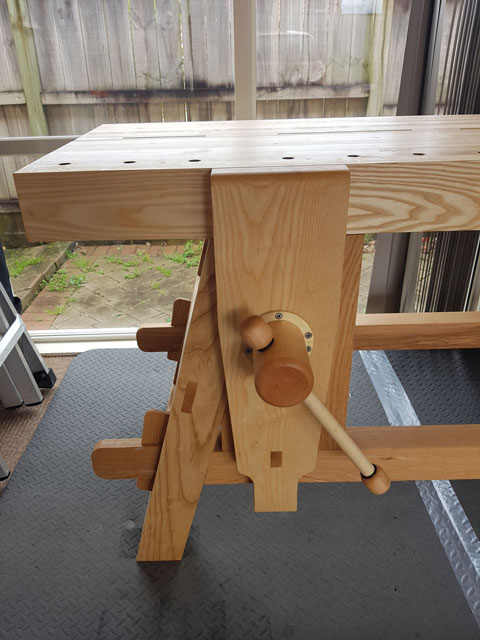
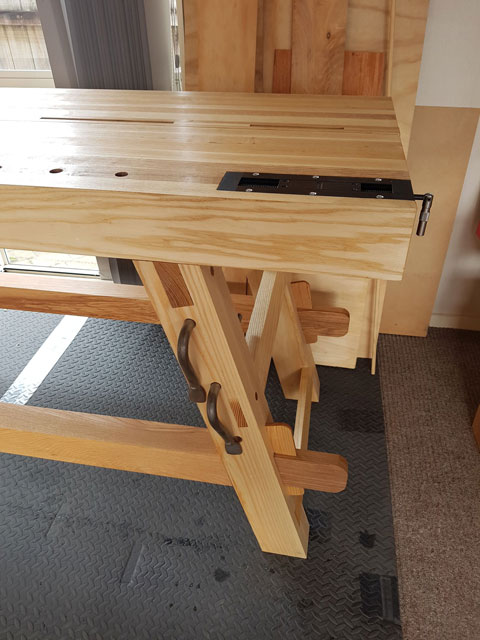
The bench is all white ash apart from the maple Lake Erie vise screw. Even the various dowels were formed from scrap Ash used during the build (hardwood dowel is hard to come by in New Zealand). I went with a Veritas inset vise for the end vise due to its compactness since the design doesn’t have much space at the bench ends to add a vise.

The inset vise works but during the bench build process I frequently used the notched batten method (“Doe’s foot”) to hold boards while planing on a make shift bench and it worked so well I’ve since been wondering whether I even need an end vise. The things you learn…

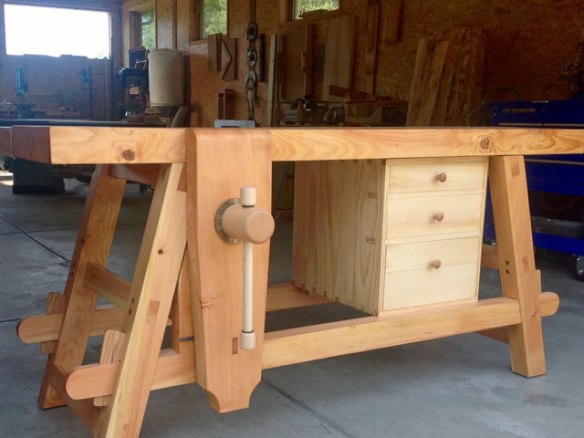
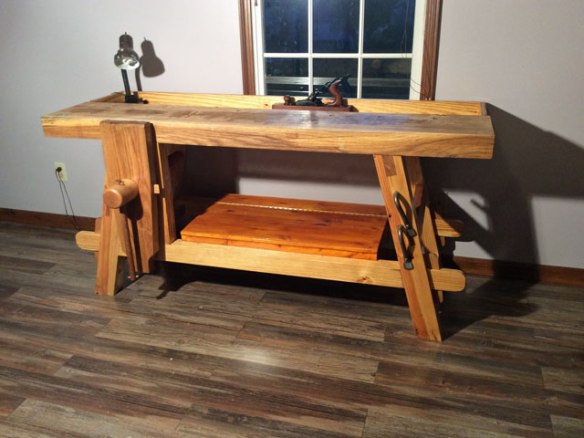
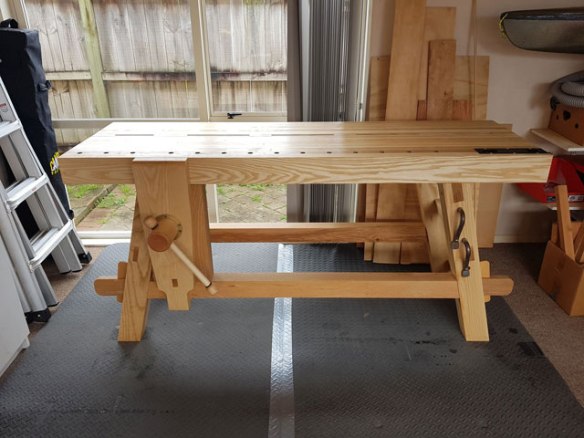
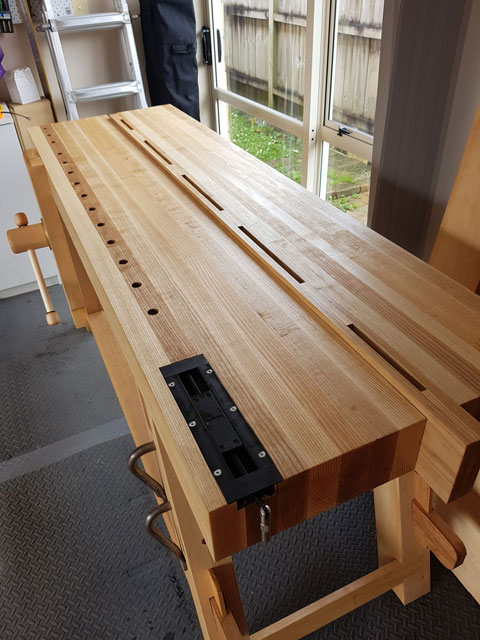
The overall length and width of the bench matches Will’s plans (76″ x 24”). The top slabs are asymmetrical with the front one about 12.75” wide and the back about 9.5” separated by a 1.75” slotted gap stop. This means that I have the option of building a tool tray like the original plans if I want in the future. It also means that with the gap stop in the raised position I can comfortably hand plane a 12” or so wide board against the stop.

The thickness of the top is 4.25” which is thicker than the original plans (3.5”) and the legs and stretchers are also a bit thicker than the plans so the bench is certainly heavy when assembled. I haven’t weighed it but the front slab alone is at least 40kgs (about 90lbs) so while the bench is technically portable you wouldn’t want to move the front slab too far by yourself!

The bench and vise are finished with Organoil’s Danish oil which is one of my favourite finishes. A straight oil finish that’s easy to apply and doesn’t leave a varnish/film finish and smells pine fresh which is a bonus :-). The top still has a bit of friction which is great when working on it.

There are still a few details to finish off including boring some more hold-fast holes, adding some cork or leather to the leg vise jaw and adding a loose tongue and groove lower shelf but the bench is up and running and the leg vise works awesome. I was expecting a fair bit of initial “squeakiness” before wearing it in but the Danish oil and paste wax on the screw threads have it running smoothly already.

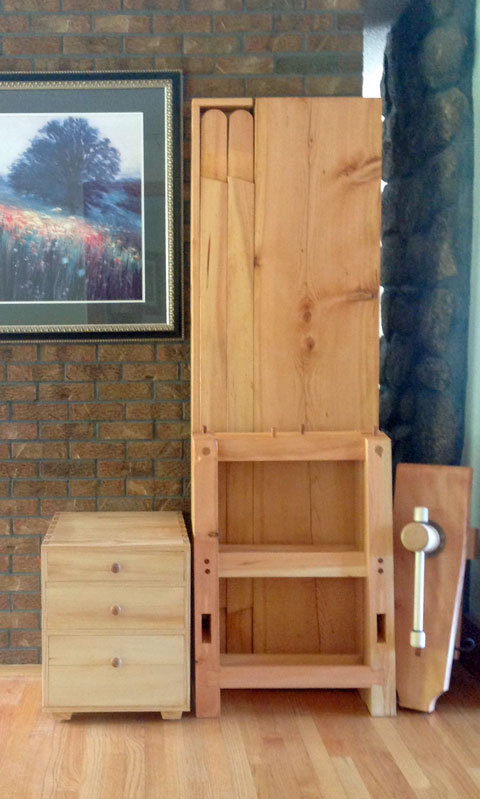
Apologies for the quality of the pictures but they give you an idea of how small my workspace is. Basically the workbench and my tool chest sit on some rubber mats about 8’x8′ in size and that’s my entire workspace. Also shown in the pictures is the gap stop in the raised position and the vise screw. If a project I’m working on needs more space I can temporarily move the car out of the garage, partially disassemble the bench tops, rotate it 90º and reassemble to give me extra room on both sides of the bench.

This project was a fun challenge and while there’s a few mistakes, it was a great learning exercise for a novice like me. Perhaps the biggest lesson learned though is that next time I should consider buying a portable thicknesser! Jointing 20+ large lengths of timber by hand is enjoyable, thicknessing them not so much 🙂

Big thanks to Lake Erie for making such wonderful vise screws. When it arrived I wasn’t sure whether to use it or put it on the shelf as a work of art it looked so amazing.

Big thanks as well to Will Myers (and Joshua Farnsworth) for creating the workbench DVD which I highly recommend and also to Will for taking time to answer some queries I had on the design.

Workbenches – Which Path Do I Follow?

When a woodworker makes that fateful decision to build their own workbench, the next logical step is – what style of workbench do I build?  Roubo, Nicholson, Moravian, Scandinavian, etc.

Then there’s the many other factors such as: what type of wood should I use, what type of finish do I need, how tall or wide should it be, should it be a solid permanent workbench or a knock-down transportable type, how much should it weigh, what kind of vises should I use, and the list goes on.

It also might be heresy for me to say, but a fully wooden vise screw & nut isn’t always the proper choice for every woodworker given their own personal situation. There are times & circumstances when a metal vise screw is the best way to go.

The short answer to what type of Workbench you should pursue is, IT DEPENDS.

It depends on many factors such as:

  • Hand tool work or Power tool work (or a mix)
  • How much are you looking to spend (a lot or a little)
  • Will it be stationary or do you need to transport it frequently
  • Are you building small bird houses & gifts or large ornate furniture
  • Planning to do lots of joinery (dovetails, tenons, etc.) or not much at all
  • Are you working in a small apartment or a sprawling workshop
  • etc, etc, etc.

By giving all of this a lot of honest thought and after a bunch of research using the many fine workbench building resources that are out there (Books, DVDs, Websites), you will eventually land on a workbench path that you must follow.  The key is that everyone should chart their own personal path to their own workbench nirvana.

Until then, I’d like to point you to some additional resources that you can find on our “Links/Info” section of our Lake Erie Toolworks website.  First off, we have a section called “Workbench Ideas” that has a huge number of workbench styles for you to peruse & consider on your path to personal discovery.

We also have several links for you to follow to check out Will Myer’s workbench builds for his Roubo, Nicholson and Moravian Style Workbenches.  There’s also a link to a Workbench video series from Paul Sellers that I think many of you will find very informative.

We’ll keep adding more informative detail on our “Links/Info” page of our website in the future to help you in your quest, but until then, keep on driving until you find the right exit ramp to your own ultimate Workbench destination,

Best regards,

Jeff Dombrowski – Lake Erie Toolworks


Announcing Our December 2016 Workbench Idea

Our latest Workbench Idea comes to us from James P. from Hurricane, West Virginia. James built a great English style workbench as well as a Moravian style workbench that he constructed at the Woodwright’s School in North Carolina.  We think you’ll agree that he did a great job on both workbenches.  So here’s your year end 2016 two-fer workbench idea!

Lake Erie Toolworks Workbench Idea, English Style Workbench, Moravian Style Workbench, Wooden Vise, Face Vise, Leg Vise

Lake Erie Toolworks Workbench Idea, English Style Workbench, Moravian Style Workbench, Wooden Vise, Face Vise, Leg Vise

Lake Erie Toolworks Workbench Idea, English Style Workbench, Moravian Style Workbench, Wooden Vise, Face Vise, Leg Vise

Lake Erie Toolworks Workbench Idea, English Style Workbench, Moravian Style Workbench, Wooden Vise, Face Vise, Leg Vise

Lake Erie Toolworks Workbench Idea, Moravian Style Workbench, Wooden Vise, Leg Vise

Hi Nick,

I wanted to thank you for the technical assistance and information on the face vise build for my English style work bench.  The screw is working great and I love this vise.  I wanted to share some pictures of my new bench and my Moravian style work bench that I built at the Woodwright  School a couple of years ago.  Both have Lake Erie vise screws and both are fantastic.

Thank you,

James P. – Hurricane West Virginia

Announcing our October 2015 Workbench of the Month

Our October 2015 Workbench of the Month comes to us from Dean W. from Victoria Australia.  He had ordered one of the Moravian Workbench build DVD’s that our good friend Will Myers had made and based on that, Dean constructed this workbench masterpiece.  One of the key points that Dean makes mention of is the fact that this style of workbench can be easily disassembled, transported and then reassembled.  So if you need this type of flexibility, then the Moravian workbench might be your cup of tea.

Lake Erie Toolworks, Moravian Workbench, Leg Vise

Lake Erie Toolworks, Moravian Workbench, Leg Vise

Lake Erie Toolworks, Moravian Workbench, Leg Vise

Lake Erie Toolworks, Moravian Workbench, Leg Vise

Lake Erie Toolworks, Moravian Workbench, Leg Vise

The idea of a portable workbench has always intrigued me ever since buying a workmate – that was until I built a solid bench with real vises. So when I saw a DVD for the Moravian workbench for sale I was hooked. Following Will Myers instructions l built it over a period of two months part time. Unlike Will I incorporated machinery where I felt appropriate but still spent a far bit of time with handsaws, chisels and brace.

The bench is built with what is described as construction grade F17 hardwood. The benchtop section is laminated together to get the right size. I used Old Brown Glue for any joinery except for the top which used titebond 3. I finished it with Organoil Danish oil.

I never imagined I would build a workbench with a leg vise but have been converted and impressed with its workholding capacity. Nick at Lake Erie Toolworks was a great help when buying the hardware and suggested using the external garter. Overall I am impressed with their products and service.

I also installed a HNT Gordon tail vise. Boring dog holes to accept hold downs and bench dogs with centers 45 mm from the front edge. I find this distance good for use with joinery planes, routers even sanding.

The bench is very solid but easy to dissemble and reassemble thanks to wedged through tenons on the rails. Supposedly the original bench which is at Old Salem NC was moved to the jobsite where needed. It easily fits in the back of a station wagon.

For images of the build visit my instagram page @louiss100.

Photos taken at Montsalvat.

Dean W. – Victoria – Australia

Announcing our August 2015 Workbench of the Month

Our August 2015 Workbench of the Month comes to us from Ron G. from Wellington, Florida.  Ron has built a great Moravian Workbench with a leg vise that is patterned off of our good friend Will Myers’ Moravian classic and we think you’ll agree that the workbench turned out fantastic.

Moravian Workbench, Leg vise, Lake Erie Toolworks

Moravian Workbench, Leg vise, Lake Erie Toolworks

Moravian Workbench, Leg vise, Lake Erie Toolworks

It is the first workbench I have built and one of the larger projects I have completed. It is built completely‎ from southern yellow pine (except the tusk tenons which are scrap oak). The only local source I could find was a large lumber yard that would not let me pick through the pile, so I had to take what I got. There were inconvenient knots and edge runout. I was able to work around or sandwich most of the defects.  Given the space available, I settled on a size of about five feet long and two feet deep. I bought 2 x 10 10’s. I planed then down to a uniform thickness, removing most of the rounding of the corners in the process. For the top, I ripped them to 3 1/2″ inches and glued up the two top sections which I then used my thickness planer to make a uniform thickness. The legs were also glued up ‎from the 3 1/2″ pieces. Other parts were ripped and cut to size.

The bench  is based on Will Myers’ Moravian Workbench:
http://www.wkfinetools.com/contrib/wMyers/moravianBench/moravianBench-01.asp

Design notes:

  • I chose to use a split top with no tool tray… I wanted the additional work surface and knew a tray would just collect junk. Splitting the top with a gap accomplished three things: it made the top sections light enough to be movable by one person‎; it gave me a place to put chisels where they wouldn’t roll to the floor; and it meant I did not have to make the facing sides perfectly mated.
  • I rabbetted‎  the inside edge of the long stretchers to allow me add a (removable) shelf.
  • My end vise is an old Wilton that was salvaged‎ from the workshop of a friend’s dead father.
  • The front vice is a slanted leg vice. I did not want to obstruct the shelf with the additional structure needed to support a vertical vice. I did have to widen the left, front leg to make sure there was enough support for the screw.  The screw hardware is yours (Lake Erie‎ Toolworks). For the parallel guide, I tried something different. I got a 1 1/8″ oak dowel and drilled a larger hole through the leg.  I then flush mounted a deck mount for steel pipe that was slightly larger than the dowel. I am hoping that the thread will catch on the dowel and keep things parallel. Time will tell (though I expect I’ll need to fiddle with it).
  • I got a pair of the Gramercy holdfasts and am very happy with them.
  • The base is finished in milk paint – I was concerned that it would rub off the leg onto work, but I emailed Megan Fitzpatrick to ask about her experience with her painted bench and she told me not to worry.
  • The top and vise‎ chops are finished with three or four coats of a homemade mixture of boiled linseed oil, varnish,  and mineral spirits (1:1:1).

Build notes:

  • Most bench builds I’ve‎ seen seem to take place on an already constructed bench. This was not an option for me. I used a pair of rickety saw horses, at Black and Decker Workmate, and the floor of the garage (the only thing I had that was sturdy enough on which to chop mortises). Working on the garage floor was interesting – it reminded me of those old prints of Japanese woodworkers. On the other hand, the wood chips and other debris left marks in all the wood.   Oh, well.
  • My hand cut partial thickness dovetails look like crap. This was true of most of my joints – no matter how carefully I laid them out and cut them, they looked sloppy when glued up. More importantly, however, they were solid.
  • I screwed up when making the saddle joints for the short stretchers across the top of the legs. I chose to make the long dimension parallel with the face of the bench to try to increase stability. Unfortunately, this made the glue joints in the legs parallel‎ with the‎ short stretchers. When I inserted the short stretcher to glue it, despite having test fitted the joint, it split the leg’s glue joint.
  • I used small jig (sort of visible on top  of the sheet of paper on the shelf) to keep my bench dog holes lined up. The drill bit was a 3/4″ Irwin Speedbor. It has a lead screw and three flutes. It’s incredibly aggressive (almost scarily so) and just tore threw the benchtop.

I’m really happy with the finished bench. It is solid and heavy enough to not move when in use. It holds‎ work well. The fit and finish could (should?) be better, but it’s incredibly functional – and that’s what really matters.

Ron G.

Moravian Workbench DVD Build With Will Myers

Heads up that our good friend Will Myers has completed a new DVD entitled “Building the Portable Moravian Workbench with Will Myers” that will be available this Spring 2015.

Here’s a YouTube Link to get an advance quick look at this video effort.  Also, here’s a DVD Notification Web Link so that you can get notified when the DVD is ready for sale later this Spring by Popular Woodworking.

Great Job Will Myers!

Will Myers, Moravian Workbench, Wooden Leg Vise


Moravian Workbench Build At The WoodWright’s School With Will Myers

Moravian Workbench, Leg Vise, Lake Erie Toolworks

Heads up that our good friend Will Myers will be leading a series of five day classes building Moravian Workbenches at the WoodWright’s School during 2014 assisted by the main man himself – Roy Underhill.

The first two sessions: April 30th-May 4th and July 9th-13th are full at this time, but the third session is now open and will be scheduled in the near future based on the people signed up on the course waitlist. These workbenches are absolutely beautiful as well as functional and transportable. They also happen to feature a Lake Erie Toolworks wooden leg vise as a part of the bench.

Here’s a quick weblink to directly access the WoodWright’s website in case you want to join the fray.

Best regards,
Nick

Moravian Workbench Education

We have a special guest blog article courtesy of Will Myers from Boonville, North Carolina who taught a Moravian Workbench building class at the Woodwright’s Shop in North Carolina earlier this summer. He’s going to give us all an education on this great workbench style via the following detail.

A few years back I was doing some research on different forms of the Andre Roubo workbench that people were building looking for ideas for the one I was working on at the time. I ran across a blog of a fella building a massive Roubo bench in a high rise apartment. The last entry was over a year old and he had gotten the huge laminated yellow pine top glued up and planed flat. I checked back a couple of times later on and never saw any more updates, the blog is no longer up now. Whether he ever finished the bench or not I do not know. So what does this have to do with a Moravian style work bench? My first thought when I read about this bench build was how was he going to get it out of the apartment if he decided to move? What he was building was not, in my opinion anyway, at all ideal for his situation. Even if he made it to where the bench broke down, he would have run off every good friend he ever had trying to move just the top alone. I have absolutely nothing against the Roubo bench, I believe it is as close to workbench perfection as is possible to attain but its one biggest asset is also its biggest fault: mass. I built a Roubo bench of my own and it is wonderful, especially if you do a lot of hand tool work. I have only had to move mine once since I built it but I will be honest; it makes my back hurt just thinking about moving it again.

A few months after building my Roubo bench, Chris Schwarz posted some pictures on his blog of the workbenches in the collection at Old Salem North Carolina, a preserved Moravian village founded in 1766.

Moravian-Workbench-1There were a couple of photos of a smallish bench with angled legs that broke down to move around to jobsites. Luckily for me Old Salem is not far from my home so I went down and saw the benches in person and took some measurements. My favorite details of the bench were its simplicity, the look of the angled legs, and of course the fact it disassembled for transport.

Moravian-Workbench-2

The original bench was made of oak and yellow pine. I set about building the bench almost identical to the original with one major change and that was the top. The original had 2 ½ in thick by 16 in wide top. I, while in the process of building the bench, ran across an old white oak beam from a dismantled barn that was 3 ½ in thick and 13 ½ in wide and decided to make this work for my bench.

Moravian-Workbench-3

Moravian-Workbench-4

Moravian-Workbench-5

The thicker top really ended up improving the bench; it has a wonderful solid feel that I love. I had some concern over the narrow work surface but that turned out to not be an issue. If you ever look at old workbenches you will notice that most of the wear and tear on the bench top is in the front 6 to 8 inches of top. I never noticed this until I started using this bench; most of the work you do is on the front few inches of the bench. I also added a homemade wagon vise and row of dog holes.

Moravian-Workbench-6

Moravian-Workbench-7

The Moravian bench is solid, stable, and completely resists racking pressure. I also love the look of the bench. It is always nice when a bench combines functionality with attributes pleasing to the eye as well.

Moravian-Workbench-8

I am not trying to push this bench design on anyone, there are many of good designs out there and would recommend to anyone to do some research before building any type of workbench. There are several good books on the subject as well (my favorites are The Workbench Book by Scott Landis and The Workbench Design Book by Christopher Schwarz). Although the Moravian bench is a historic design, I think it fits in beautifully in the modern woodworker’s shop, particularly for those with multi-use or smaller work spaces and mobility requirements.

Moravian-Workbench-9

My one recommendation to someone building a workbench would be to build one to be used above all. Do not worry with flawless finishes or exotic woods, build something you will not be broken hearted if you scratch or dent it. If your bench is too nice to use then it end up being useless to you. A good workbench will make your work easier, faster, and be a lifelong companion in all the projects you undertake.

Will Myers – Boonville, NC